Showing posts with label BLOGGING. Show all posts

Friday, September 19, 2014

Best forum plugins for wordpress website and blog

Posted by Jaysukh Patel
You want to solve solution on your product and information then forms connection in required for all wordpress developer and blog admin. Here you will find best forums plugins for your wordpress website and blog. Online forums are alternate option to make your website like social network. If you believe in traffic and solution sharing on social media then online forum for your wordpress is best options.

Useful: How to make website faster and increase traffic on your website.


Top best forum plugins for wordpress website and blog

Vanilla Forums

Vanilla is Free and open source forum plugins for wordpress website. Millions for trusted blogs and online portals are using this plugins. Vanilla has many advance features as compare to other forum plugins, like easy setup with your wordpress database, clean interface, admin panel and more.
Vanilla boons for new blog owner who want to develop blog on online question forums and solution.
Here you can find full step by step installation guide on Vanilla Forums installation.

wordpress forum plugin
Vanilla forum plugin

bbPress

bbPress for wordpress plugins is second option to choose forum plugins after Vanilla forums. Many advance option with bbPress like WP admin panel integration, Works great with buddy press, wow design and page templates.
Vanilla wordpress forum plugin
bbPress forum plugin

Simple: Press

Simple press is fully integrated on wordpress, this form is complicated as compare to Vanilla Forums, bbPress. It’s many drawbacks as well as benefits.

• You can install this plugins only through FTP.
• Complex admin design and maintain
Vanilla wordpress forum plugin
Simple press forum plugin
Best Max CDN alternatives for your website.

What you think, on Best forum plugins and which you like most, Don’t miss to share on below comment box. Are you using any another alternate wordpress plugins? Then also share with US! We will add in above wordpress forum plugins list.
Read More

Tuesday, September 16, 2014

How to make website faster with increase speed and performance

Posted by Jaysukh Patel
done

Are you pro blogger or website developer that you must have to know about MAX CDN (Content delivery network) plans, How to apply Max CDN, benefits of Max CDN and best pricing for you. Millions of happy website customer and owners are enjoying speed and performance of own website. Are you one of them, not So please real all the benefits on Max CDN network how helps you.

You can check your Site by entering domain (Here). From here you will get mathematical calculation and score own your wordpress website. Are you getting above 90% score and page load in two number figures then you don’t have to go with any CDN network.

Key points to increase website speed and make your website fast

What is CDN? And How that will help in increase website load speed?

CDN – Content delivery network, this network transfer you data like image, text and JS to nearest server in your country. This will decrease time to deliver data from server to your website’s viewer. Once you applied CDN service in your website, CDN servers store all the data in all the server country wise. When your visitors come for visit, nearest server respond first and deliver data in minimum time duration.

Why we go with MAX CDN?

MAX CDN is the largest CDN network in the area of CND network service. MAX CDN is best trusted CDN services by millions of customers are very pleased. MAX CDN giving best plans verity as of user’s requirement and websites view and visitors. Ex, if your website primary traffic coming from European countries that you can apply only for European country CDN network. At and of result you will get cheap and efficient result for CDN service.

Max CDN helps to increase index your website in top best search engine. It’s hence that google also give priority on website page load time. For measure time go here

What will be store MAX CDN server?

• You website theme images
• Website js files
• Themes CSS files
• All images uploaded in your post and pages

Which plan you should apply in your website to increase speed

First of all, you have to checkup your website monthly bandwidth usage, for the beginner should be categories in start plan. To know monthly bandwidth usage you can ask your hosting provide or Go in your control panel.

Mac CDN giving starter plan and High volume plan on the bases of how your website use bandwidth per month, For the beginner you can go with starter plan.
You can sign up and also use for trial period, so don’t wait for apply in Max CDN and make your website faster.


Steps to integrate MAX CDN to your website, Apple Max CDN to your website

Step 1
Install W3 Total cache plugins in your wordpress dashboard,

Step 2
After installing W3 total cache Go configuration setting in plugin > Max CDN > Tap on CDN tab.

Step 3
Then enter your CNAME and API code. (Given in below screen)
Max CDN for wordpress Setup -Plans and Sign up
Max CDN for wordpress Setup from yoast.com

Step 4
Tap on Test NetDNA, Now you god message on Test passed.

Step 5
After test passed, tap on save all settings.

Don’t miss how this post helps you, if you have experienced with Max CDN then serve comment in below, so keep helping and share this article with your friends.
Read More

Friday, August 15, 2014

How to install wordpress on Hostgator Step by Step

Posted by Jaysukh Patel
Install wordpress on Hostgator is beautiful experience to host your blog or website. So each blogger and website developers are try to find steps for install wordpress on Hostgator. So here i am sharing article on how to install wordpress on Hostgator in step by step guide.

If you have any problem, To install wordpress on Hostgator than comment in bellow comment box. So let's we are starting for to install wordpress on Hostgator in step by step guide given in below.

Benefits to choose Hostgator host for wodpress blog orwebsite.

• Free domain
• Unlimited Hosting space
• Unlimited Bandwidth
• Unlimited Emails
• 24 x 7 customer support
• Quick Install
• Cheap Hosting Plans: $3.95/month
• 45 days money beck guarantee

Steps to install wordpress on Hostgator

Wordpress install on Hostgator is much easy as compare to other. Wordpress alternatives are drupal, Joomla, magento might be taken more time to built website or blog. Here you can start your blog in 5 minutes and just in 1 click installation.
So let's start wodpress install on Hostgator guide in one click.
In Wordpress host on Hostgator, for your blog or website You have need perfect domain name.
To know, How to choose best domain name: Domain registration sites

Step 1 - Install WordPress on Hostgator

Purchase best hosting plan from its official site: www.hostgator.com
You will receive Hostgator mail in your register email ID. From that email id with the details of your Cpanel link.
Do login with submitted User name and password with registered yourself.
Now open Cpanel with given link in your mail.
Cpanel > Software/Services > Fantastico de Luxe

Step 2 - Install WordPress on Hostgator

Install wordpress on Hostgator step by step guide 2
Install wordpress on Hostgator step by step guide 1

Install wordpress on Hostgator step by step guide 2
Install wordpress on Hostgator step by step guide 3
Image credit, wpfreesetup.com

Now, you next screen should be looks like in below image,
Select Wordpress to install as a blog or website.
Submit the accurate details of your blog. Because of some changes can create problem in SEO(Search Engine optimization). in this step you have to submit following details,
• Domain name: You can use multiple domain names as a sub domain.
• Admin Username: As admin login in wordpress.
• Password: use for login password.
To open login you have to use below link: www.yourdomainname/wp-admin.
• Admin Nike name
• Admin Email Address To receive updates
• Site of wordpress blog name
• Description: about your blog
Then click on install wordpress.

Step 3 - Install Wordpress on Hostgator


Install wordpress on Hostgator step by step guide 4

Now your next screen should be submitting email address to receive latest updates, Data base user name and password in future.

Then click on send email.

Now your Wordpress install on Hostgator successfully done. You can login using user name/password using below link format

Url to login and add in your wordpress dashboard,

Name of your domain name/wp-admin
Ex, www.howtoisolve.com/wp-admin

Now in your next task should be these, Apply different wordpress theme from your dashboard, install external plugins, change blog or website style, and other useful settings.
Useful: Google adsense alternatives in 2014 for Blog or website and adsense revenue sharing site

That can earn extra dollar from your blog or website.
To know more about wordpress installation, SEO strategy on your wordpress blog, way to increase Pageviews and pagerank.
Read More

Thursday, July 10, 2014

How to add Meta tags inside head tag of wordpress website php code file

Posted by Jaysukh Patel
More over webmaster and SEO master always find the way to add meta tag inside head section of wordpress website. You can also check meta tags important on your website traffic directly from top best search engines. Know more about meta tag from official site click here. From this post you can learn about why we have to add meta tags inside wordpress website and how to add meta tags in inside head section of wordpress body.

Don’t miss: Top best free directory submission site for website.

Using this methods you can also add google analytics code inside head tag of wordpress website.

Note: Using this method for add meta tags in side head section you don’t need any meta tags wordpress plugins.
Add meta tags inside head tag

Why we have to add meta tags in head section of wordpress php file

1. Meta tag guide to search engine for indexing with time to time.
2. Meta tag defines description, title and author of website or blog.
3. It also helps to blog some url from search engine for all time.
4. Meta tags have hundreds of name and value parameters.

Steps to add wordpress Meta tag inside head tag of wordpress website through code – without plugin

Step 1
From the dashboard go
Appearance > Editor
From that you have to open functions.php file.


Open function file of your WordPress website

Open Functions php file from side files


Step 2
Go functions.php file from righ side bar of wordpress dashboard. (Given in below)
image
Past below code in function in side php tag. Given in below.

function add_meta_tags() {
echo '<meta content="index, follow" name="robots" />';
echo '<meta content="1 days" name="revisit-after" />';
echo '<meta content="all" name="robots" />';
echo '<meta content="all" name="googlebot" />';
echo '<meta content="general" name="general" />';
}

add_action('wp_head', 'add_meta_tags');
Meta code inside function php file

Step 3
After adding file click on save button file
Now you are done,

Related search:
• How to add bing meta tag inside head file in wordpress.
• How to add more than one meta tags inside head in php code file.

Useful: Top best keyword density checker tools for your blog or website.

I hope you have solved your solution. If you are not able to add meta tads inside head section on wordpress code file than comment in below. If you like this article on your search how to add meta tag inside php code file don’t miss to share.

Read More

Wednesday, May 21, 2014

Top best blogger theme template looks like Facebook: Facebook theme for blogger template

Posted by Jaysukh Patel
Facebook theme is very popular on web more over query in blogger theme are best Facebook theme, Blue color theme like Facebook, Facebook templates for blogger, so each and every blogger and might be aspect to apply Facebook theme in your blogger blog. As well as it’s good for business also. Use Facebook theme motto behind it that create brand or publicity easily of own blog or website over internet without doubt. Here I tried to gives best source of Facebook blogger templates. You can use it after download and install in from your blogger dashboard.

Don’t miss: Best free SEO friendly - responsive Blogger template collection in 2014

Best Facebook template theme for blogger blog

Facebook Theme: Btemplates

Open source Btemplates gives facebook blogger templates in free. For demo templates click here and download from there in your browser.

Direct Download link from here

Don’t miss: How to install blogger templates from your blogger dashboard?
Features of these Facebook Templates
Overall good user rating should be keep happy to you in futures with this template.
• Right blog post description in big area,
• Blue top tab exact looks like Facebook design and search box also there
• Easy to readable style
Best Facebook Template for Blogger blog
Best Facebook Template for Blogger blog

Facebook Theme: designrshub

Designershub designed Facebook theme with very well done job to create same a Facebook look likes theme. Thanks to designrshub.
You can download This Facebook blogger theme from here.
More installation step by step guide visit here. Navigation and design of Facebook theme See below screens
Best Facebook Template for blogger blog - designrshub
Best Facebook Template for Blogger blog - designrshub


Related Search:
Facebook themes for blogger blog in free
How to download blogger blog theme looks like Facebook
Blues Facebook theme for blogger

For more queries related to download links and another troubleshooting helps kindly stay your speech in below comment box. We will be glad to assist you.

Read More

Monday, May 19, 2014

Free directories listing sites to submit your website or blog for SEO improvement for your blog

Posted by Jaysukh Patel
Top best Blog directory for pro and free listing of your website gives more SEO (Search engine optimization) score in short of time period for blog and website. Here you can activate plan for prelisting of your website or blog after analyst by top SEO webmaster and SEO master guide in truthful way. After submitting or sharing your website and blog on social networking sites your next step should be submit your webpage link in open directory that helps to meet other useful links as well as promoting our link to other also. At the end of your can generate virtual relation with target visitors and users of your blog and website day by day.

Best Free and pro directory listing site for website and blog in 2014


Don;t miss: Best ways to generate primary traffic from USA, UK and London.
                  Keyword Tools for SEO (Search Engine optimization).

List of best directories to submit your website and blog

1. Best of the Web blog Search

This directory gives free 30 day trial solution for customer satisfaction. After that you have to go with pro plan for hundreds of different category submission.

2. Bloggeries

Bloggeries provide best service with only premium plan. Using this directory listing you can jump directly by activating one best pro directory listing plans at any time.

3. Eaton Web Blog Directory

Eaton also gives direct listing of your website only with pro plan. You can submit your blog in litter paying.

4. OnTopList

From this sites you can listing any type for category on different subject link Blog directory, Web directory, and Articles directory. To start listing in OnTopList you have to simply register your self on site.

5. Blog search Engine

Blog search engine gives two different plans as pro blogging listing. Here you can see plan and pricing. For more about BSE you can get guide from How to promote your blog.

6. britblog

britblog provides service free for all categories blog and website. To submit URL listing you have to simply add logo in your website. This blogging directory helps to archive SEO from British visitors.

7. bloggernity

To submit your blog or website listing you have to register yourself than enjoy unlimited directory listing on hundreds of differ topics.

8. Sutradirectory

Sutradirectory is providing directory listing service for mostly on Law, Health and News, Technology tips and tricks. To submit your site in sutradirectory you have to simply register yourself.

9. Blogflux

Blogflux giving service with blog listing counter near to 2 lacks over the world wide. This free service might be useful to listing on mostly major categories over there.

10. Bloglisting

From the bloglisting you can add your link or article in free over top most popular topic.

11. Reals

Reals providing both free and pro service to enhance its service for both users including plans like free, Standard Listing, Express Listing.

12. Technorati

Technorati is most popular blog listing free service over this time. For that you can to register your blog in your account in free.

13. bloghints

bloghits gives free service with reciprocal link on your website or blog. To active premium service you should active one of best as of your requirement given there.

Useful: You must Use awesome useful plugins for your blog or website.

Wordpress ping lists of 2014 to increase index of your website page.
You might miss one of best SEO tips in free.

Increase SEO score, Pageviews, Pagerank and Alexa rank sharply.


Related Search:
Top best directories in 2014
Best Premium directories with trial use for blog or website SEO and becklinks
Top popular directories and web listing sites.

We hope you will be enjoying best top directories for free and pro listing of your websites and blog. Thanks for visiting. You have any suggestion past your thought in below comment box. don’t miss to share this article with your friends.


Read More

Ways to create shorten URL of your website and web page URL online: Easy to share

Posted by Jaysukh Patel
Convert your website URL in to custom page URL by converting long URL including keywords might be much longer apart from this now you can convert it in to short URL using this below trouble-free ways.
You can see shorten URL in many places. This types of shorten URL don’t showing website name named keyword (post title) in web address of post.

Benefits of to use Short custom URL of your webpage

Twitter word count

Top most sites which are sharing your post daily on hundreds of social sites with millions of people on social sites. So short URL much useful in limited word count in post one of them is twitter.

Highlight your description as compare to URL

Most of the times we can’t write full description to avoid long post.

You can also buy (Register your current URL) short URL for all time

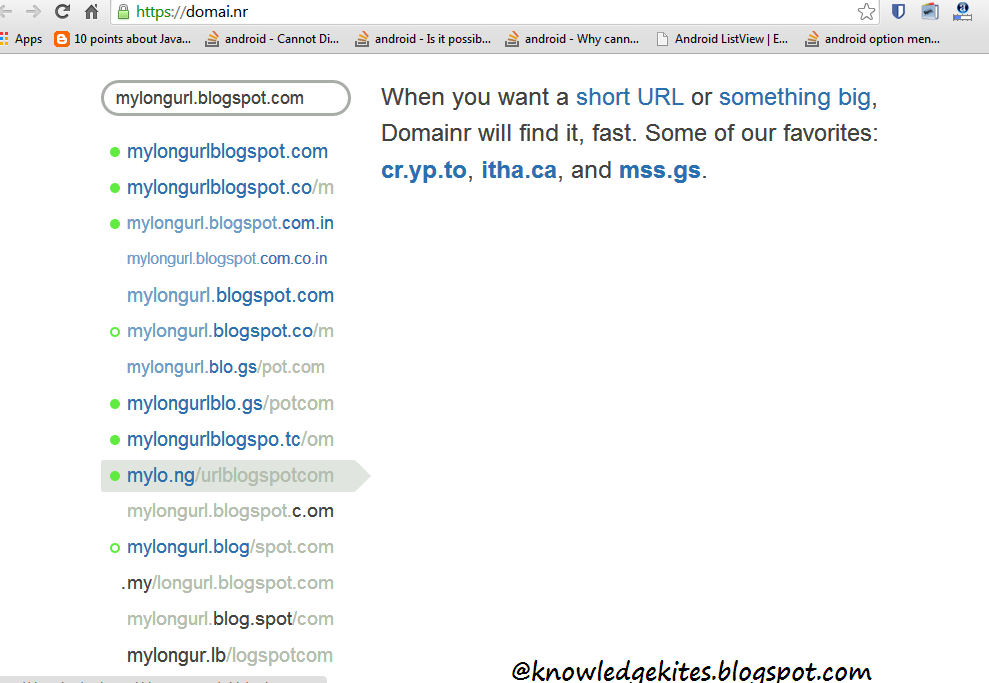
Domainr providing this types of services in which you can search your web address in search box give there. Now suggestion as a short URL related your search comes in below search box see in below picture.
Convert long URL to short URL from Domainr

From this above picture you have to choose best short URL which is related to your current domain name. Now at the end you have to register domain from any domain registration sites like Godaddy.com or Domain.com or bigrocks.com

After registration you can set short URL as secondary web URL of your blog or website.

Auto generated custom URL by online tools

Here tens of most popular tools are available online. Using this sites you can convert your page’s long URL into short URL.
1. https://bitly.com
2. http://goo.gl/

bitly
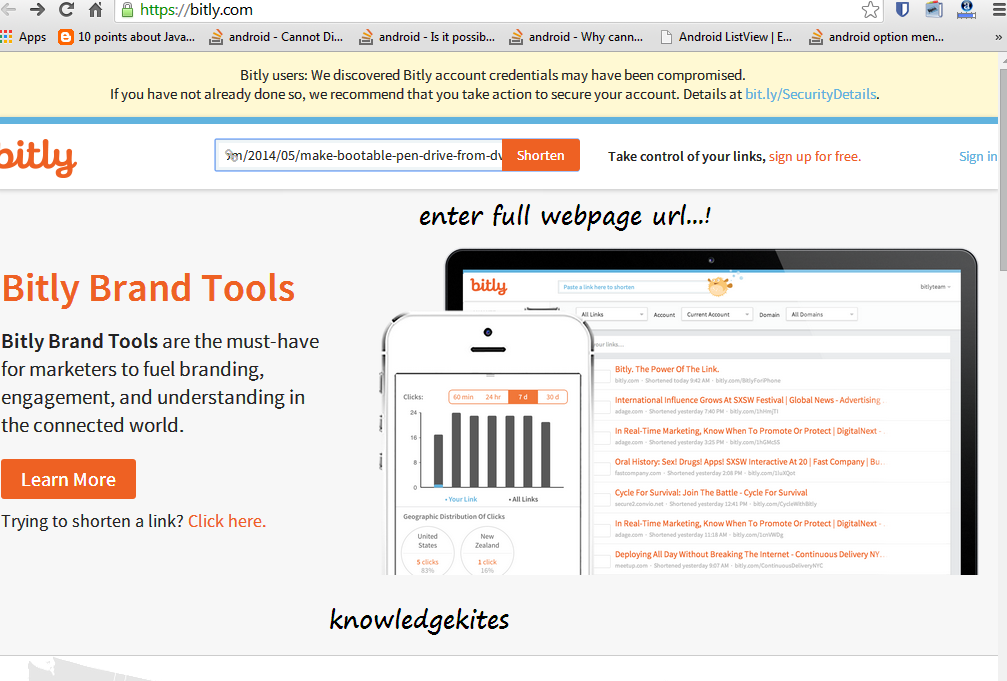
You can use bitly without registration so registration is not require to convert log url in to short url. But simple registration gives much more benefits like direct share on social sites Facebook, twitter at any time. After converting in to short custom URL you can save it in your account securely.
Convert long URL to short URL from bitly.com step 1

Convert long URL to short URL from bitly.com step 2

Useful: Top best social sites for SEO to increase visitors sharply.

Goo.gl
Use goo you must need Google account. Because its google project. Goo.gl use google api to generate your long webpage URL in to short one. After converting your URL in to short, it will automatically save in your account.
Convert long URL to short URL from goo.gl step 1

Both bitly and Goo display reports for total click on url.

Related search:
How to convert long URL in to short custom URL in free?
Benefits of to convert long URL in to short URL
Best online sites to make custom post URL.

You have any suggestion than put your speech in below comment box. we import your voice in our article. And Don’t miss to share this article on below sharing button.

Read More

Friday, May 2, 2014

How to change payee name in google adsense (Solved) for all unsupported countries

Posted by Jaysukh Patel
Hello, Google adsense advertiser you are worried about on wrong payee name or misspelled name in your google adsense account. But you can change it. Here you can get idea on “How to change payee name in India” ,”How to update google adsense account name (Payee name)”. if you are belong unsupported countries list for change payee name in google adsense. But you can change through the below method with valid reason. If you don’t have google adsense account than google adsense can’t listen your voice through the mail to google adsense support team.

List of countries’ advertiser never can change google adsense payee name : Algeria, Bahrain, Bangladesh, Brazil, china, Egypt, India, Indonesia, Jordon, Kuwait, Lebanon, Libya, Malaysia, Morocco, Nepal, Oman, Pakistan, Palestine, Philippines, Qatar, Saudi Arabia, Singapore, Sri Lanka, Thailand, Tunisia, United Arab Emirates, Vietnam and Yemen. But you can change payee name with humble request to change payee name in your google adsense account only.

Useful Read: High paying CPC keyword for country wise to increase adsense income
All time most expensive keyword for your website and blog

Step to apply for change payee name in google adsense from India, and other unsupported countries


Step 1: Go on your Gmail account that mail id used in to open google adsense account.

Step 2: Through this mail you have to send one request mail to google adsense team.

From address: Your Gmail account
To address: adsense-support@google.com

Step 2: Send mail using below format with title as “Change the payee name”.

In subject body you can use below mail format
Dear Sir/Madam,
I want you to please change my AdSense payee name from "Your wrong Payee name" to "new payee name" because of the following reasons :
“Give valid reason for to change payee name” 
My Adsense Publisher ID: pub - **************
My Current Payee Name: Wrong payee name
Country: only name of country 
Thanks for corporation.
Your Sincerely: Google Adsense Publisher

After sending it you will receive thanks mail by google adsense support team. And wait for 24hr.

In reply I received below mail see in picture,
Google adsense payee name change for unsupported country

Google adsense give me EFT(Electronic Funds Transfer) option. In this option you can change payee name at anytime without permission to change payee name at any time. And I am from India.
Google adsense payee name change for unsupported country 2

Google adsense payee name change for unsupported country 3

Read Below,


Related search for this post, from this article you will get the answer of below questions.

How to change Google adsense payee name?
Trick to change payee name without cancel google adsense account.
How to apply for EFT in google adsense account?

I hope you liked this useful post. So don’t miss to share this article with your friend.
Thanks to Google Adsense Team,
Read More

Wednesday, April 30, 2014

How To Transfer Blogger Blog From One Account To Another Step By Step Guide

Posted by Jaysukh Patel
Hello, blogger this article is very useful for all including me also because “You can also transfer or move whole blogger blog from one account to another blogger account using below step”, “You can change admin of blog in blogger”. The main thing is that using this step you don’t need to change blog name, Blog URL, Comment on post. Using this process you can transfer blog without lose Pageviews and visitors, Pagerank, Becklinks and alexa rank, SEO score also.

Useful: Best Way to build up becklink for your blog and website.
         : Best SEO (Search Engine Optimization) technique

Step to Transfer or Move blogger blog from one account to another

Step 1:
I have one entertainment blog which I want to transfer from my blogger account to my friend’s account.
Blog name is “Entertainment”. Here I gave this account named “A”.
Second blogger account named account “B”. And I want to move and transfer whole blog from account A to B. See Blogger account A. Given with Example below.

Click on Settings of that blog.
Move to Transfer Blogger blog from one account to another Step 1

Step 3: Now you are moved in particular blog setting see in below. And than click on Add author link give in below screen.
Move to Transfer Blogger blog from one account to another Step 2

Step 4: Add email address of Account B. And click on invite author’s button.
Move to Transfer Blogger blog from one account to another Step 3

Step 5: Open your second account “B” in another browser. Check mail of account B’s email address. After, click on Accept invitation button from your verification mail.
Move to Transfer Blogger blog from one account to another Step 4

Step 6: Now you are move in another tab in same browser for account B. Here all the details about blog are appearing you want in your blogger dashboard. And click on accept invitation.
Move to Transfer Blogger blog from one account to another Step 5

Step 7: Now you can check in Blogger Account “B”. You can see blow with limited options to access this new blog. Now you are guest of this blog. Though this you can only post article and submit to main account A.
Move to Transfer Blogger blog from one account to another Step 6

Step 8: Now move on old browser, Account A. Than refresh page and give the permission for as an admin. Changes automatically saved after selecting admin option from there.
Move to Transfer Blogger blog from one account to another Step 7

Step 9: Now move in Account B and refresh blog dashboard give in below screen. Now you are also admin of blog. Using this rights you can do any this what you want.
Move to Transfer Blogger blog from one account to another Step 8

Step 10: Now you can remove first admin from account A.
Your job is successful done. Enjoy and keep posting on your blog to get more traffic.
Move to Transfer Blogger blog from one account to another Step 9

You also find,
How to give gust right on my blog?
How to move or transfer blog from on account to another?
How to make more than one admit in blogger blog?
How to change blog authors on my blog?

Click to know more on other useful article on How to, Computer, SEO, Blogging.

Friends, Don’t miss to share this article. Someone is finding this technique. You can also comment in below comment box.

Read More

Sunday, April 27, 2014

How To Add Facebook Smiley And Emotions In Blogger Comment Box – Customize Blogger Comment Box

Posted by Jaysukh Patel
Facebook smiley and emotions in comment box give batter look throughout user can inspire to comment something by adding Facebook emotions shortcut key give at each smiley and emotions that’s give in blow picture. At the beginning time blogger is always finding how to add Facebook emotions and smiley in comment box. Using this article you have to simply find code and past below code that’s given in below post one by one.

You are facing problem to add Facebook smiley and emotions in your blogger you can put your comment in below comment box.

Facebook smiley and emotions prove batter experience to enhance your visitors by talk to speech frequently using smiley and emotional in comment box.
Add facebook smiley and emotions in blogger comment box

Step to add Facebook smiley and emotions icon in blogger comment box


Step 1
Go blogger dashboard > Template > Edit HTML (See in below image)
Add facebook smiley and emotions in blogger comment box step 1
Add facebook smiely and emotions in blogger comment box step 1

Step 2
After clicking on Edit HTML you can see full XML code in your screen. From there you should find code line by pressing Cltr + F. Now you can see one search box at top corner of coding window see in below image.
Add facebook smiley and emotions in blogger comment box Step 3
Add facebook smiley and emotions in blogger comment box Step 2

Step 3:
Find below code
<div class='post-footer-line post-footer-line-3'>

Step 4:
Find above line code and paste below code after above line.
<b:if cond='data:blog.pageType == "item"'>
<div style=' width: 450px; text-align: left; border: 1px dashed #0084ce; background: transparent; padding: 10px; color:#000000; font-weight:bold; '>
<img border='0' src='https://blogger.googleusercontent.com/img/b/R29vZ2xl/AVvXsEjH0gRwg7c68TW7AcbT9eDmwGYLGWdp-tlmlQGNzmWmFvDmcMewSoTeu2LtajZvfmDNKvwRFeqNNFHDRsfl3rxLYpusrD7WCWv-u1_2AI9FBpw4U3ik5C3gFkL24ol-8hINJS1Kt1-xqdYl/s1600/helplogger.blogspot.com(1).gif'/> :a
&#160;
<img border='0' src='https://blogger.googleusercontent.com/img/b/R29vZ2xl/AVvXsEjhneeVLOjbzex6E1qmgbMOYeDTtSn_YC0aCFGGOt1_GU9fruK8YUVz53QlctOapbjTStp_KHecs6wJ41UAp6mwyiHLC26hllCmcKq2Ntbdq6Ryo6NgaiBiJdm8ulU5Iy_Sv8RDp_-xSSw_/s1600/helplogger.blogspot.com+(2).gif'/> :b
&#160;
<img border='0' src='https://blogger.googleusercontent.com/img/b/R29vZ2xl/AVvXsEhelQrMg43XeD26pKfybS4n_TrfQUdKx4xmE6u-d7s0xZ7mO6tCpoJ3JaMMDsdkoz_6GaTI46kKxfe__OOXCXbZl84FGO6kJ-diGbgXB4iPoS9tPFtyoOUmhTKj9qZWzVJ1xdUJk85PGro2/s1600/helplogger.blogspot.com(3).gif'/> :c
&#160;
<img border='0' src='https://blogger.googleusercontent.com/img/b/R29vZ2xl/AVvXsEilT42MvsZ3EWKOH7Zva_vBDkFUFo-II2bMNaXpibY7ScQVhsa7JGlFc0s0VtqBHqRwXy82aX7MI8ECCQ4BmfkRVdluK186f52NPfr3Fjvoa9C7PozrCPEDAKW8xKzt0Qvso5vy84K2cpL4/s1600/helplogger.blogspot.com(4).gif'/> :d
&#160;
<img border='0' src='https://blogger.googleusercontent.com/img/b/R29vZ2xl/AVvXsEhf49V7Gihvkcr0bqK6KBPmhmWDeXXd0m_W3Loy0RpCKdRMtKSqvtEA5HeZdiRsyQJzNG1_QYEYXTv_B2fou1aZ39AdYu48JeDOH4z2ppzsCl1v_q0i1ERJBTHElJLTElO3wHxEIwrINCQU/s1600/helplogger.blogspot.com(5).gif'/> :e
&#160;
<img border='0' src='https://blogger.googleusercontent.com/img/b/R29vZ2xl/AVvXsEiAqoYrz7H3CUqYW6owJsFaGHzyKC2JPUrKXSJqi_j1rU8P3kk3NUht0jbc1LRCcJYEpxB1X1tl3lbOrogvqmbV3uLHiMIyIhSOpbcsfKc7O0hrGzjSnZSLJvOqL5fKxkuwZp2feNssIT40/s1600/helplogger.blogspot.com(6).gif'/> :f
&#160;
<img border='0' src='https://blogger.googleusercontent.com/img/b/R29vZ2xl/AVvXsEjNQiztNY_FoVhnyzkoDxs3pMprRIpPOz8IG-qpdHtMTPb8NDxn-hOKSH0zX0V-2acTJar5WAT2DDBbAs_FwPUIGmbutOiTJ4Iu27cHAgrvVo7iAxT_IMbCWmngaWxI_ojF9V-hJz4c0fSN/s1600/helplogger.blogspot.com(7).gif'/> :g
&#160;
<img border='0' src='https://blogger.googleusercontent.com/img/b/R29vZ2xl/AVvXsEjRECYTvSgnKaDbwdwIDIMt-1XAGkTaAFKIMTw9NMynZ-jRp84plhjVKGwhWd0m-KWDEBma7i0OGDFuRZVezoihQxXEe1mIPwsX2xIYJbZLsztcy3QJVQHqBVfbYhxRi91ss7zmUgtoeWQf/s1600/helplogger.blogspot.com(8).gif'/> :h
&#160;
<img border='0' src='https://blogger.googleusercontent.com/img/b/R29vZ2xl/AVvXsEgUlhCsg-14eID7hv9uznuguWSK2Xn5mMdD07bYj-rJE5fNPqFBmUvUt-U-GBxPRdUbZN70L5ncEue4JbZrsiouoimQoa_JON1bKlfrU5qsjzVRQut3Ss6pz2XCcO8naddhMfHrYZ7FkjQ2/s1600/helplogger.blogspot.com(9).gif'/> :i
&#160;
<img border='0' src='https://blogger.googleusercontent.com/img/b/R29vZ2xl/AVvXsEjG1zzZfRLvbA73Mbw3sNSl1YDW4ucvV06s5X2IJNRGMViVNr_PPl_HFph2_k39HdpmedkshucVkvwf-mRtb1AAChQ6Xz9e0WfazIoxmfPYRqUMW1Fjqx0E_uX28m1lSxT80NEDfjyWvP3J/s1600/helplogger.blogspot.com(10).gif'/> :j
&#160;
<img border='0' src='https://blogger.googleusercontent.com/img/b/R29vZ2xl/AVvXsEhCQNLHZEqktQQSjQCefKx3UE13_WfWwrMhEMhbZJ-znNXb09XXeYfl6EhcREjaxq_7snpW4nl02s8Wb9EwAVAh-notNbId7HyO4kkT-YztUPCJTfzhB3TE-dazRCxcKABRB1oztSzwXZKq/s1600/helplogger.blogspot.com(11).gif'/> :k
&#160;
<img border='0' src='https://blogger.googleusercontent.com/img/b/R29vZ2xl/AVvXsEgPxIXTaP4FQUFQjsotSPxLcUhqGBQOxpNooDFU6DI7g6UmbTDfrWZQ25VVbewRmwj8kjh7a5IJlU3eRbkthex1R1hmR1tzcTiDhzGrM58wvBklhrIB-DLA6cezB4PGXsicMCf2etBEu2vF/s1600/helplogger.blogspot.com(12).gif'/> :l
&#160;
<img border='0' src='https://blogger.googleusercontent.com/img/b/R29vZ2xl/AVvXsEiCvKmB_aHxcobdiZWLqEB4L7V8hc6Uxm_u663zOxYqMFocXz657t4R6VorPNnHijXrydCETkM4e-9eeTxGH6JwIBZwzS-_28abTuDeeBL5UzsjpVTuOS9kw5pb6EnDUGNEqLBdASyEQgYD/s1600/helplogger.blogspot.com(13).gif'/> :m
&#160;
<img border='0' src='https://blogger.googleusercontent.com/img/b/R29vZ2xl/AVvXsEjuRNyv8FvK69H5zqgjbnew0R2NgsQVserM9_eFEQnottXnUI9lgzW_5TiXmhe0H1Y55eAF92BCFWT91Ofl2ea_klEcyK9wQgXMivWT1YK7x-yDEVcFz5CsBVKO5qxRqoNzaCv6TQCIpk9F/s1600/helplogger.blogspot.com(15).gif'/> :n
&#160;
<img border='0' src='https://blogger.googleusercontent.com/img/b/R29vZ2xl/AVvXsEgMHkKNga6jonmjRpRhIs8ijgmOKYVvXV2PAbuakAVqkKmIIOZP3q5pJPkOq0IzszHjO7ey6H42br1BYS8uXCtOOuc6oTP0HKC0Q_LpJUhM-J-yTqsc8qaZiFloU_7xudK5eVdz-HWMXbCI/s1600/helplogger.blogspot.com(16).gif'/> :o
&#160;
<img border='0' src='https://blogger.googleusercontent.com/img/b/R29vZ2xl/AVvXsEiMAzTZ-6tlnNKt6CsEwpYXk7Sc1xTB4cLyfvx6UB6L6pYeA2iUk1bLm5JU4Bd-tz-aXtGYxI3WlePeOWpyHgzhgWQgW8rjg2vJ1aQ965ZmDxtksfydDr0WZd-4FHnwIukwYeElWPZ6JIlG/s1600/helplogger.blogspot.com(14).gif'/> :p
&#160;
<img border='0' src='https://blogger.googleusercontent.com/img/b/R29vZ2xl/AVvXsEjfrXVLRDIPdYK0TodlnqC6aNba-zJQRHb9zKkyyN9u_vVuW_UhVbkYl6l_qqHgEHKjlZEFJ5YdURDbSOPctLt-OHt66qepw51EU7VTl1bpl21S5W2w2qEENc6SS5gF-rGmMugsfdAxGkUs/s1600/helplogger.blogspot.com(17).gif'/> :q
&#160;
<img border='0' src='https://blogger.googleusercontent.com/img/b/R29vZ2xl/AVvXsEiDD1bE_7soHJwHuOmymV66E5vEB3SiVyYY5bhkxG-F6IEg6JpgPTSVODEkwcgoetA41bggR6uN3p8De0U9GGaNtLW846ML4rSLq_9XsSg7Vzsj1lQwoBUe6yC5jV9LR6EDxAHUv6QmJs7e/s1600/helplogger.blogspot.com(18).gif'/> :r
&#160;
<img border='0' src='https://blogger.googleusercontent.com/img/b/R29vZ2xl/AVvXsEgAMVp1fxJZZS9RKLclMYKMIyxMJx9BOnqxST4g6ZdkSWioNU9Xvjw-cIHB6up_3fn8QgwBIl8ye8T-8okSBu3Z_xUfmiPe2DznIon5gGSCnurmxSQ5XSxuyqWNEcmjBZlx30eDfuj3By7b/s1600/helplogger.blogspot.com(19).gif'/> :s
&#160;
<img border='0' src='https://blogger.googleusercontent.com/img/b/R29vZ2xl/AVvXsEiEdGcl-UVnUhWzDOoSeHG50e2j2Yrz49t2Z-OGFZ7f6l3lnGVeSyp8RHFaOrqe3YRLKkfVzB9PAPa41dBjAnYVYvCfwAYfhZifILK0kmrNtM7LmsEx3OoOWLumBFHd29oZD0zZr1MOXQp7/s1600/helplogger.blogspot.com(20).gif'/> :t   <a href='http://helplogger.blogspot.com/2012/05/add-facemoods-emoticons-to-your-blogger.html' style='color: rgb(30, 122, 183); font-size: x-small;'>Add smileys to Blogger + </a>
</div></b:if> 
Step 5
Now find below code, Body end tag

</body>
Step 6
Past below code on above  </body> tag
<script type='text/javascript' src="http://helplogger.googlecode.com/svn/trunk/facemood emoticons.js"/>
<script type='text/javascript' src="http://helplogger.googlecode.com/svn/trunk/facemood emoticons threaded.js"/>

Stpe 7
After pasting step 6 code your job is done. Now save your code by pressing save template button. Hopefully work for you because it works for me successfully.

Related Search for this post
How to add emotions and smiley in blogger comment?
Different Facebook smiley and emotions java script with different style.
Best funny smiley and emotions for blogger comment box.

Don't miss to read our Most use full article on Blogging, How to Guide and SEO for blogging.

You facing problem put in below comment box. Also don’t miss to share this post using below sharing button.


Read More

Wednesday, April 23, 2014

Page number navigation in blogger – Page Number, Next, Previous post navigation in blogger in different style

Posted by Jaysukh Patel
After long time I got correct code for Page number navigation for blogger blog. In Last two month I search many queries on “How to add page navigation on my blogger blog home page”, “different style for page navigation”, “and Beautiful style for page navigation with next previous button”. Finally I applied many of style in my blog. You also can apply in your blog easily through the below step by step guide. For that you don’t have any type of html or CSS programming knowledge. Just read carefully each step any apply in your blog one by one. Here in this post I give three different style code you can apply any one of three.
page navigation for blogger blog in different style

More useful for your blogger in blogging niche please read our articles on useful blogger tricks


If you have any problem than put your comment in below comment box than we can help you!

Step to add Page number navigation in your blogger blog


  1. Apply one of three style for different look
  2. Apply single java script


Three different styles for page number navigation in your blogger blog

Adding CSS Step 1
Go to Blogger dashboard > Template > Click on Edit HTML
Click on HTML code and Find tag “]]></b:skin>” with “Cltr + F” button. After pasting tag in search box inside html code hit enter and find this tag in your code.

Adding CSS Step 2
Paste below style code just above “]]></b:skin>” tag in your blog code.

Style 1 : Style for Simple look and feel
.page-navigation{clear:both;margin:30px auto;text-align:center;}
.page-navigation span,.page-navigation a{padding: 3px 7px;margin-right:5px;background:#E9E9E9;color: #888;border:1px solid #E9E9E9;}
.page-navigation a:hover,.page-navigation .current{background:#CECECE;text-decoration:none;color: #000;}
.page-navigation .pages,.page-navigation .current{font-weight:bold;color: #888;}
.page-navigation .pages{border:none;}
Style 2: Style for Black and orange number page navigation
.page-navigation{clear:both;margin:30px auto;text-align:center;}
.page-navigation span,.page-navigation a{padding: 5px 10px;margin-right:5px; color: #F4F4F4; background-color:#404042;-webkit-box-shadow: 0px 5px 3px -1px rgba(50, 50, 50, 0.53);-moz-box-shadow:0px 5px 3px -1px rgba(50, 50, 50, 0.53);box-shadow: 0px 5px 3px -1px rgba(50, 50, 50, 0.53);}
.page-navigation a:hover,.page-navigation .current{background:#EC8D04;text-decoration:none;color: #fff;}
.page-navigation .pages,.page-navigation .current{font-weight:bold;color: #fff;-webkit-box-shadow: inset 0px -1px 2px 0px rgba(50, 50, 50, 0.69);-moz-box-shadow:inset 0px -1px 2px 0px rgba(50, 50, 50, 0.69);box-shadow:inset 0px -1px 2px 0px rgba(50, 50, 50, 0.69);}
.page-navigation .pages{border:none;-webkit-box-shadow: 0px 5px 3px -1px rgba(50, 50, 50, 0.53);-moz-box-shadow:0px 5px 3px -1px rgba(50, 50, 50, 0.53);box-shadow: 0px 5px 3px -1px rgba(50, 50, 50, 0.53);}
Style 3: Style for Black and blue number page navigation
.page-navigation{clear:both;margin:30px auto;text-align:center;font-size: 11px;background-image: -webkit-gradient(linear,left bottom,left top,color-stop(0, #000000),color-stop(1, #292929));background-image: -o-linear-gradient(top, #000000 0%, #292929 100%);background-image: -moz-linear-gradient(top, #000000 0%, #292929 100%);background-image: -webkit-linear-gradient(top, #000000 0%, #292929 100%);background-image: -ms-linear-gradient(top, #000000 0%, #292929 100%);background-image: linear-gradient(to top, #000000 0%, #292929 100%); padding: 6px;-webkit-border-radius: 3px;-moz-border-radius: 3px;border-radius: 3px;}
.page-navigation span,.page-navigation a{padding: 3px 10px;margin-right:5px; color: #fff;}
.page-navigation a:hover,.page-navigation .current{background-image: -webkit-gradient(linear,left bottom,left top,color-stop(0, #59A2CF),color-stop(1, #D9EAFF));background-image: -o-linear-gradient(top, #59A2CF 0%, #D9EAFF 100%);background-image: -moz-linear-gradient(top, #59A2CF 0%, #D9EAFF 100%);background-image: -webkit-linear-gradient(top, #59A2CF 0%, #D9EAFF 100%);background-image: -ms-linear-gradient(top, #59A2CF 0%, #D9EAFF 100%);background-image: linear-gradient(to top, #59A2CF 0%, #D9EAFF 100%);text-decoration: none;color: #000;-webkit-border-radius: 3px;-moz-border-radius: 3px;border-radius: 3px;}
.page-navigation .pages{border:none;background: none;}

First part adding CSS is complete now you have to adding the script.

Adding Script Step 1
Find the blow tag in your HTML code , If you don’t find full line code then try this code only “ title='Blog Posts' type='Blog'>”

<b:widget id='Blog1' locked='true' title='Blog Posts' type='Blog'>

Adding Script Step 2
Put below code just above step 1 line code


Read More

Wednesday, December 18, 2013

How To Start A Blog? What Is Blog? How To Create A Blog Website? Define Briefly Make Money From Blog

Posted by Jaysukh Patel
Now Website or Blog creation is not tough as compare to two or three years ago. You can make your personal and public blog and website own self after following the below steps through the guide. You can make any type of blog on any topic, subject in any language. Blogging and website creation now available in any language through the any language supporting all the popular browser without any doubt.


Now the question is that which platform gives me a free blogging. So now hundreds of blogging platform available so far. But I short out list of best and popular web platform to create a blog.
For that you don’t make any request to anyone it’s free of cost. The thing is that if you are note well-known programming (Simple HTML code) than Blogger is the best for you otherwise you can build your blog in wordpress with free or pro (Hosting) website or blog.

Step by Step guide to create a blog – Start a blog guide

            1. Blogger platform
           Google is providing blogging service in free word wide without any verification. You can access                     blogger account using your Gmail login details (EamiId and Password).

            Go, www.blogger.com

            2. Wordpress platform
            Go, www.wordpress.com

            Why Wordpress is the best?

            The reason behind use wordpress as a blog and website platform causes it providing free SEO plug-in in free. That helps to keep visitor crowd on your blog. Wordpress is fully open source and its support PHP language. You can customize through the modification of code using the basic knowledge of PHP.
If you are interested to become professional in blogging then I recommend using wordpress as blogging platform.

You can also use other web platform to start blog in free: Look other web and blogging platforms.
Best SEO plug-in for Wordpress and Blogger as blogging platform to get traffic on web.

Give your reviews in below comment box. we will be glad to help you.
Read More

Sunday, December 15, 2013

Best Adsense Revenue Sharing Sites To Earn Money Online From Advertising On Website Or Blog

Posted by Jaysukh Patel 2 Comments
Adsense revenue is the best adsense program to earn money online by the help of below mentioned list as adsense revenue sharing sites for all time. Thousands of sites using this service and get huge income as a adsense publishers from that sites. To get approval as adsense publishers for your site you have to follow the rules and regulation in the process of adsense approval fast.

Best adsense revenues sharing sites

Adsense revenues sharing sites work as an adsense distributor in world wide. If you would to implement your adsense code on other sites on your publisher ID than your account will be ban in short of time by the google adsense automatically without any notice and declaration.
So please always follow the google adsense revenue terms and conditions and must be follow.

List of Best adsense publisher sites as revenue sharing sites

1. Youtube.com
Way to approve your adsense account through the Youtube adsense partner program from here.

2. Blogger.com
Blogger place second rank in Adsense revenue sites, because it has totally own blogging platform.

3. Hubpages.com
Hubpages gives more options in the valley of earning as ad publisher through the co partner like adsense, Yahoo, Amazon, and eBay. You can cover a high income through the Hubpages in short of time.

4. Squidoo.com
Squidoo works with charity. Squidoo pay the part of income from the ad networking to the social activity in world wide.

5. Xomba.com
Xomba gives adsense on your site in place submitting the unique article on decent topics and worth full manner.

6. Flixya.com
Flixya gives 100 percent income on ad through the blogging, Video and Photos. Flixya also good for to refer friends and get income policy. Flixya gives much more options to earn money online.

7. Lazzeo.com
Lazzeo is the best social networking sites include best revenue sharing sites for all time.
Lazzeo helps to get more income with submit your adsense ad code in your profile.

Other Adsense revenue sharing sites:

1. Bizpreneur.com
2. Rotatrixfriends.net
3. Matrixmovies.com
4. Qassia.com
5. Infobarrel.com
6. Blogburner.com
7. Contributor.yahoo.com
8. Demandstudios.com
9. Suite101.com
10. About.com
11. Ehow.com
12. Tutorial9.com
13. Shetoldme.com
14. Meshplex.com
15. Epinions.com
Incoming search for this post:
  • Revenue sharing sites
  • Best revenue sharing sites in 2013 - 2014
  • Earn money online through Revenue sharing sites
  • Google adsense revenue sharing sites

Friends, I am helping guide in blogging, Computer and Internet. You can read our daily news letters on different subject. So subscribe out daily news letter’s through the mail.
Don’t miss to share this post on Facebook, Google and Twitter.

Read More